
Scrum and Kanban are pretty well known in the agile community, but there’s a third version of agile methodologies that tends to get overlooked.
This may be because it’s a combination of the other two, making it seem like it’s not its own thing, but Scrumban is a hybrid that offers marketers a practically painless entry point to agile marketing
Unlike Scrum, it doesn’t require a huge overhaul of team structure or work management.
Unlike Kanban, it doesn’t leave you adrift in a sea of agility without any guidance on exactly what to do first.
In the interest of helping more people learn to love this methodology that brings together the best of both worlds, I’ve put together this guide to getting started with Scrumban for marketing.
(For those looking for general background information, you can find that here and here.)
Step 1: Visualize Your Current System
Note that we’re creating a visual representation of your current system, not the one you wish you had. It won’t be perfect, and it might be pretty, but this is an absolutely crucial step to rolling out Scrumban on your marketing team.
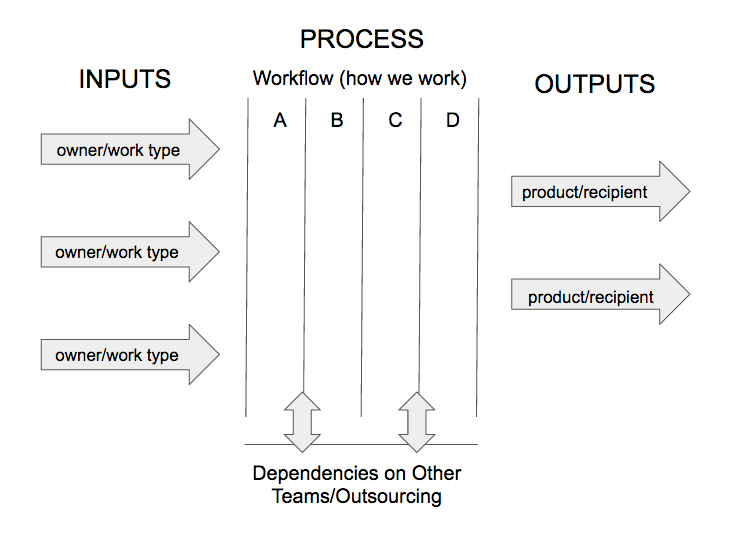
The whole team participates in this step; no fair having a manager or director lay out the way they think things work. You’re looking to identify these four key elements:
- Inputs: The kind of work coming in to the team, including where it comes from. Other departments, executives, and customers are come sources of marketing inputs.
- Process steps: The stages of discovery or refinement work passes through from the time the team accepts it to the time it’s considered complete. Complete might mean published, or submitted for review, or something totally different for your team (and it might even vary from project to project).
- Work performed by others outside the immediate team: If you share resources with other teams, require approval from other departments, and/or rely on outsourced work, be sure to document that.
- Outputs: The team’s completed work, including where it goes and who gets it. Maybe this is a live website, or maybe you hand it off to development for publication. Capture the final phase of your work’s lifecycle here.
If you’re struggling to get a handle on a generalized workflow, it can be helpful to have each team member go through the exercise for two or three items they currently have in progress. Discuss how the work came into the team, what the team member is expected to do, and what’s likely to happen once their work is done. After you do this a few times, you should start to see patterns that you can translate into a visual diagram something like this:
Step 1.5: Workflow into Kanban Board
Once you’ve got the work flow down, it’s time to create your first working kanban board (yay!). You can start with a physical or a virtual board, whichever works best for your team configuration.
As a general rule, co-located teams will have an easier time maintaining a physical board than dispersed teams.
When designing your first kanban board, simplicity should be your guiding principle. But you’ll almost always get better results if you push for something more specific than three columns labeled “To Do,” “Doing,” and “Done.”
That may be okay for some teams, but most of the time it’s not going to be reflective of your real workflow.
Fill your board with your current workload, and you’re all set.

Step 2: Measure Your Performance
These next four steps take place in the context of real work, so you need to start moving items from left to right across your board as their status changes. The board belongs to the team as a whole, not to the manager or Scrum master, so each person is responsible for keeping their tasks current.
After you’ve been working with your board for a couple of days, it’s time to start capturing and understanding some basic Scrumban metrics. The most important ones at this point are:
- Amount of work in progress (WIP): Work that’s been started, but isn’t finished yet.
- Blockers: Things that are keeping an item from moving to the next stage on the kanban board.
- Lead time: Amount of time it takes an item to travel across the board.
- Throughput: Number of work items completed in a given time period.
Measuring Work in Progress (WIP)
First, divide the total number of items the team is working on by the number of members on your team to get an average amount of WIP per person.
So if you’ve got 42 items being worked on, and 7 people on your team, you’ve got an average WIP of 6 per person.
Talk about how this number seems for your team. Too much? Too little? Just right?
Identifying Blockers
Look at the work that’s currently blocked and discuss how it got there. Are blockers more common in some parts of the process than in others? How long do items stay blocked?
After only a few days you may not have much data on this point, but you should continue to revisit it as issues arise.
Tracking Lead Time
You’ll need to capture how long it takes each item to travel from one side of the board from the other to get your average lead time.
The team can break this down by item type (blog posts vs. social media campaigns, for example) and/or plot the times on a histogram to gain a deeper understanding of what’s really going on.
Once you’ve been tracking lead time for a while you’ll be able to state with confidence how long it will take your team to complete different types of work, as well as make adjustments if the lead time starts to increase.
How to Measure Throughput
Although only marginally helpful in these early days, tracking throughput consistently over time will help you decide if adjustments to the system are having an impact.
Step 3: Introduce WIP Limits for Focus and Stability
Before we can start trying to improve a system, we first have to stabilize it. WIP limits are one of the best (and simplest) ways of doing this.
Eventually we hope to apply WIP limits based on the system’s actual capacity, but in these early days applying some random limits can be very revealing. Remember, WIP limits restrict the number of items that can be in each column of your kanban board, so if you hit your WIP limit for work that’s “In Progress” you can’t start a new project until one has been completed.

Discussions about the effectiveness of WIP limits (and the stability of the system as a whole) can be a great topic for daily standups. These short meetings remain a part of a Scrumban team’s day, but they aren’t status reports like you find on Scrum teams.
Keep in mind that WIP limits aren’t set in stone. You can make adjustments to streamline your workflow.
Step 4: Improve Your Understanding and Management of Risk
While this is a very powerful component of Scrumban, understanding and managing risk can complicate early adoption efforts unnecessarily. To keep things simple at first, consider quantifying only the cost of delay.
Whenever unplanned, emergency work is introduced onto the team, track its impact on your current work in progress. Did the throughput go down? Were more items blocked until the fire drill was completed? Were there marketing opportunities that were missed due to delayed releases?
These delay costs are real and significant, especially for marketers in competitive industries, so spending some extra time to monitor them can provide a data-driven foundation for push back on work that gets called an “emergency” when it really isn’t.
Step 5: Continuously Improve
While this article is only about the first steps in adopting Scrumban, your long-term goal is to continuously improve your process through regular experimentation and iteration. As Reddy puts it, “Teams should continuously seek process improvements, and continuously improve their ability to identify and prioritize the efforts most relevant to the capabilities they want to improve.”
Part of this process is to help individual team members adopt habits and thought processes that will allow them to embrace this mindset.
Coaches and Scrum masters can help by guiding teams to conduct basic experiments, such as attacking average lead time by adopting a new team policy on blocked work items. They can also help to identify and avoid patterns of unsafe change.
Retrospectives, regular meetings where the team meets to discuss and improve on its process, are crucial. Be sure to hold them religiously after each iteration.
(Many thanks to Ajay Reddy, whose book The Scrumban [R]Evolution provided much of the foundation for this guide.)

